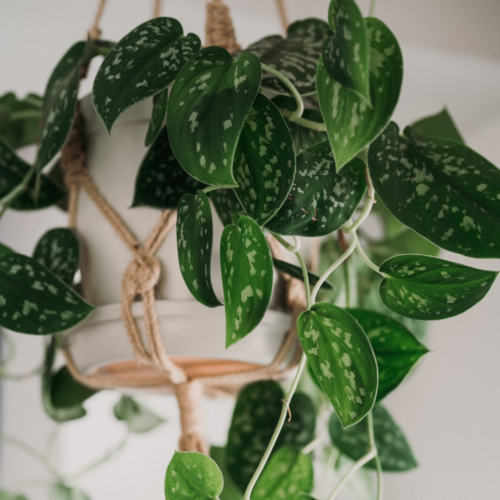
Here’s the thing… a lot of us love the look of beautiful vines climbing fences or trellises, or maybe even over an arbor. There are many unique and downright stunning vines to choose from. However, some of you might be looking for functionality as well as beauty. Whether you’re an urban gardener or have an expansive backyard paradise, edible vines can significantly increase your garden’s appeal and productivity.
Edible vines like Passion fruit, Kiwi, and Grapes, not only yield delicious produce, but also provide an ornamental value to urban and suburban gardens. Innovative utilization of vines such as Scarlet runner beans, Chayote, Groundnuts, and novel ones like Loofah plants and Nasturtiums can be beneficial for versatile vertical gardening. It will not only create an aesthetically pleasing landscape, but it will also add a sustainable food source to your garden!
If this excites you, then check out these edible vines that won’t just be beautiful in your landscape, but will also give you a great harvest!

Understanding the Value of Edible Vines
In contemporary urban and suburban gardening, limited space has demanded innovative solutions. People just don’t have the acres and acres of sprawling lawn and large expanses of space between them and their neighbor’s lot. Because of this, people are asking even more from their garden space. Enter vertical gardening. Vertical gardening has become more appealing due to the fact that it not only saves space, but many of these plants can be grown in large containers, making patio space and raised beds more productive.
These vertical vines then require less ground space while providing high yield. They also can play a decorative role as well, enhancing the charm of your landscape by creating an elevated level of greenery.
Imagine the mixed delight of climbing roses and passion fruits, the rustic appeal of grapevines coursing across a trellis, or the playful wind whispers among beanstalks. Experiencing these joys don’t have to be solely for sprawling farms or vineyards. Even a compact patio or balcony garden can now enjoy the functionality and aesthetics that edible vines bring into the space.
Edible vines are also beneficial in the garden. Many of these plants enrich the soil, provide shade to the understory crops, and even act as natural fences.
Imagine the benefit of having a vine that, in addition to bearing fruits, also aids in improving the overall health and growth of your garden!
So let’s get into these awesome edible vines that can amplify the beauty and productivity of your garden.
Edible Vines
Edible vines variety is as vast as the climatic conditions they require. From tropical to temperate climates, there’s an edible vine perfectly suited for your garden. Here are a few that will add touches of beauty as well as productivity to your space.
1. Passion Fruit
The passion fruit vine is a tropical marvel that is both easy to propagate and yields an abundance of sweet, edible fruit. Let’s just say that this vine has been growing in popularity for those who live in warmer climates! The fruit is tangy and sweet and can be used in a variety of different ways. The flowers are also edible and can be used as a stunning garnish to a variety of dishes. The vines also look stunning while in bloom with their purple, pink, blue, and white flowers! Needless to say, having one of these in your yard will definitely be a main attraction!

2. Kiwi
There are two types of kiwi, the kiwifruit (like the ones you find at the grocery store), and the hardy kiwi. Both ripen from late fall to early spring. Kiwifruit produces the typical large kiwis, however it requires warmer, more tropical regions to grow (mostly in hardiness zones 7-9). If this isn’t you, then try out the hardy kiwi! The hardy kiwi produces smaller, grape-like kiwis that can be eaten whole. These won’t grow nearly as fast as the kiwifruit, but in colder climates it will do much better than it’s tropical cousin and it will still give you that tangy taste that you love!

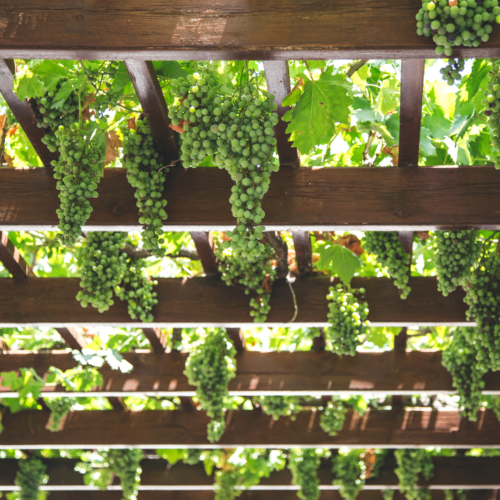
3. Grapes
Grapes can be beautifully placed within a landscape. Whether it be climbing arbors, fences, or even pergolas, the beautiful flowers followed by big, hanging bunches of grapes are absolutely lovely! And not only do you get to eat the grapes, but the grape vine leaves are also edible and perfect for a raw salad or even cooked!
Make sure, however, that proper pruning is done every year to ensure a plentiful harvest. This pruning is done to create lots of new shoots from one year old vines. It is only from these one-year old vines’ shoots that grapes are formed. So if you want a productive vine, you will need to learn and implement proper pruning techniques.
Also keep in mind that grapes will attract the birds and the bees (quite literally), so be aware of extra cleanup that will be needed if planting over any hardscape areas…

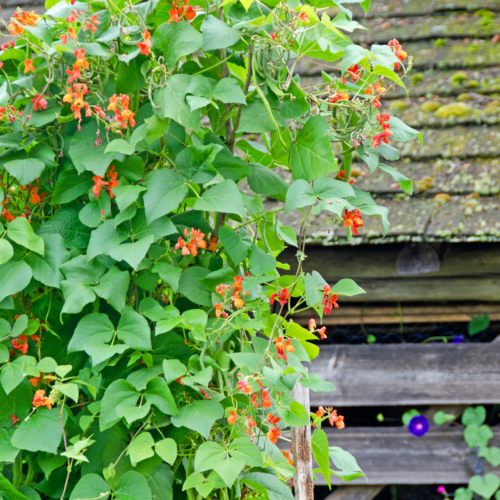
4. Scarlet Runner Beans
Scarlet runner beans are both ornamental and practical in the landscape. These climbers eagerly scale up walls and fences, producing a stunning display of striking red blossoms. Simply plant in the early spring once the danger of frost has passed, enjoy the scarlet flowers throughout summer, and harvest your dried seed pods in early fall. And as an added benefit, the leaves, young pods, roots, and dried beans are all edible!
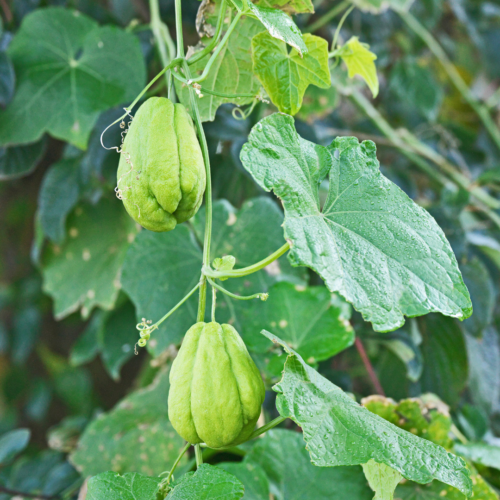
5. Chayote
If you reside in tropical or southern US states, consider the chayote vine. This vigorous climber can cover a pergola or trellis with ease, transforming it into an inviting green canopy. Then, the fruit is like a cross between a cucumber and a squash, allowing you to eat it raw, cooked, sauteed, stewed, or even spiraled! Just be sure to peel it first, since the peels are not very appetizing. So try out some new South American recipes with these delicious fruits!
6. Loofah Plants
Loofah, famously known for its use as a natural sponge, is in fact a type of vine. And, while most people are familiar with the sponge, it is less known that its young fruits are edible and taste somewhat like a zucchini. Then, if you don’t have time for harvesting, you can leave the fruit to grow and dry out. The loofah produces a sponge that can be used for scrubbing dishes, exfoliating skin, or even as a biodegradable multi-purpose scrubber! This vine is relatively easy to grow in a full sun location.

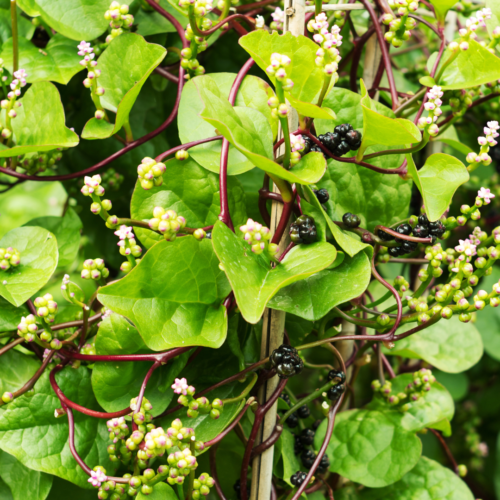
7. Malabar Spinach
Malabar spinach, on the other hand, is a leafy green vine that is a perennial in warm climates, or grown as an annual in cooler climates. Despite its name, it’s not true spinach, but its leaves have a similar taste and texture when eaten raw, or a similar taste to okra when cooked. The vine is known for its vigorous growth and can even cover a garden fence when fully mature. The entirety of the plant is edible – from its purple-blackish edible berries to its red stems and glossy green leaves, consequently providing a constant supply of greens for your meals. Just make sure to harvest the young leaves, as these are the best for raw salads. The large, mature leaves are better to be used as a thickener for soups and stews!
And make sure you have a trellis or fence to train this vine up on. If left unsupported it will vine out along the ground. This can still be pretty, but it creates more opportunity for insects and dirt to get on your leaves…
8. Melons
There are a lot of different melons that can all be trained to grow upright. These include honeydew melon, cantaloupe, and watermelon, to name some of the most common. Be careful when choosing varieties, however, as the smaller melons will do much better on an upright vine. And even with the smaller varieties, the melons will still have to be supported by some type of a sling to ensure that they don’t become too heavy and break off the vine before they are fully ripe. And take this into consideration as well as you select a support for your melon vine. Choose something very sturdy that can handle the weight.

9. Berries
While not technically a vine, many berry varieties can be trained up onto a vertical support system, such as a fence or a small trellis. This can be very useful in making harvesting and annual pruning so much easier. An upright form can also keep any thorny branches up and away from people walking nearby. All in all, it is very useful to have your berry bushes growing vertically!

10. Cherry Tomatoes
Most people know that tomatoes do well with a vertical support. However, there are many different varieties of tomatoes that actually love to climb! I remember my professor had a chicken wire tunnel in his yard that he trained his cherry tomatoes onto. By the end of the summer, his kids loved to climb underneath and pick cherry tomatoes in the cool shade of the tomato plants themselves. This not only made harvesting easier, but it created something fun in the lives of his children! You can do this with any vining plant as long as you put in some time to train it in the right direction… but nothing seems to beat those sweet, summer cherry tomatoes!

11. Legumes
I know that I’ve already mentioned the Scarlet Runner beans, but I also wanted to note pole beans in general make great climbing plants! Whether you like black beans, kidney beans, green beans, or peas (throwing this one in here too, haha!), there are an endless number of legumes out there to grow. These are also perfect for vertical planting as it makes harvesting so much easier and helps to maintain a better air flow throughout the plant which can cut down on plant disease. Legumes are also some of the easier vegetables to grow, and will help to fix the nitrogen in the soil so your other plants can better use it! So if you’re new to edible ornamentals, or you just want more fertile soil in your yard, definitely give these guys a shot!

12. Gourds
Gourds include all types of pumpkins and squash varieties. These are not only grown for food production, but are also grown for their decorative value as well. The large leaves can help to provide shade for any plants growing underneath of it! However, like the melons, make sure to grow smaller fruit varieties, as well provide a very strong structure for growing. These also need a support sling for each individual gourd, or else they will also break off the plant prematurely.

13. Cucumbers
Though cucumbers are technically also a gourd, I wanted to mention them separately. Cucumbers are one of our favorite edible plants to grow! They do best on wire frames (it’s easy for their small tendrils to latch onto) and they can quickly fill up a vertical space. And having them grow vertically is actually preferred for cucumbers as it will keep the fruit clean as well as will make it harder for insects to reach. And if you’re short on garden space, you can even grow them in a large pot. This is sesriously one awesome plant to have around!

14. Nasturtium
Getting back into more decorative plants, nasturtium is one of our well known ornamental plants that has multiple uses in the landscape. Not only will it provide a fast-growing, lush vine for any space, but its leaves and flowers are also edible. The seeds can also be pickled and are a good substitute for capers. This is one useful vine!

15. Roses
Roses are also a beautiful, edible vine. Though all roses are edible (as long as they haven’t been treated with harmful chemicals), not all roses are climbers. There are either climbing varieties or bush varieties. So make sure that you choose a climbing rose to place next to your garden trellis or archway.
Also, keep in mind that the smell of the rose will often determine the strength of the taste. The stronger the aroma, the stronger the flavor. So choose a variety that you will not only enjoy to look at, but that also smells appealing to you. And remember, only the rose petals are edible.

16. Jasmine
Jasmine is a common vine that is used not only for its lovely fragrance, but also for its edible flowers! These flowers are used to make teas, as well as can have their oils extracted to be used for medicinal or frangrant purposes as essential oils. It is said that the aroma of jasmine helps to produce a calming effect, as well as has other beneficial properties for a person’s health. So seriously consider adding a beautiful jasmine vine to your space!
Note that jasmine flowers bloom during the evenings, which is why they are widely used near lit seating areas or bedroom windows, where their fragrance can be enjoyed in the evenings as you are winding down for the day.
For more beneficial aromas, you can check out on my list of fragrant houseplants!

17. Wisteria
This is a well-known plant, but it is less commonly known that wisteria flowers are actually edible! However, do not eat the seeds or the seed pods. These parts of the plant are very poisonous. But once again, the flowers are completely harmless and rather enjoyable! So consider adding some wisteria flowers to your salad, or as a beautiful garnish!

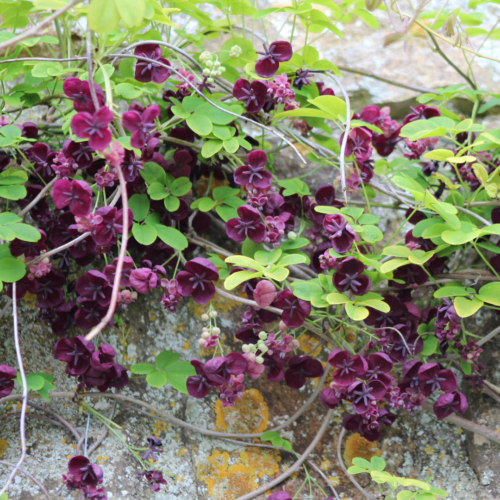
18. Chocolate Vine
This last vine is used more for its ornamental value than as an edible. That is because in late spring, this plant is covered in beautiful red to purple flowers that smell like chocolate! I mean, who wouldn’t want to have this vine next to their window?! The fruits are edible, although they do come with some precautions for those on blood thinners. Although the fruit is widely eaten in Japan as a delicacy in late summer to early fall, you should first research if this fruit will work with your particular body. But that being said, the scent alone will make your neighbors jealous!
Conclusion
Vines are not only extremely beautiful additions to your landscape, but they can also be great plants to add from a culinary standpoint. Incorporating edible vines into your garden presents an opportunity to not only have gorgeous showy flowers and leaves, but to also enjoy the fruits of your own labor! So why not make your yard a picturesque oasis and a provider of nourishing meals by incorporating these magnificent edible vines?!
For more landscaping ideas, check out my post on Designing your Yard in 10 Easy Steps!
Edible Vines FAQs
What are edible vines?
Edible vines are varieties of vining plants that have edible parts that can be safely consumed by humans. They include a wide range of species that offer fruits, leaves, flowers, or roots for culinary uses, and many are attractive enough to be used as decorative elements in landscapes. This includes vines such as passion fruit, kiwi, grapes, jasmine, nasturtium, and more…
How do I select the right edible vines for my garden?
Selecting the right edible vine for your garden typically depends on your local climate, available space, and personal taste preferences. Research the growth conditions of various edible vines and find ones that are well-suited to your environment. And if you want a perennial vine, make sure that it can survive winters in your local hardiness zone. Then match your plant’s light requirements. And remember, some vines like Grapes and Kiwi can be rather space-demanding, while others like Nasturtiums are more compact and can be better suited for small spaces or container gardening.
Can I grow edible vines in an urban environment?
Yes, you certainly can. Edible vines are a fantastic choice for urban gardens as they can utilize vertical spaces efficiently, making them ideal for balconies, patios, or small yards. Some good choices for urban edible vines include nasturtium, cucumber, beans, and cherry tomatoes to list a few.
Are there any special care considerations for edible vines?
Specific care instructions can vary depending on the species of the vine. However, most edible vines need a suitable support to climb, enough sunlight, and well-drained soil. Regular pruning and timely fertilization will help maintain their health and productivity, as well as consistently watch out for insects, since they usually enjoy these delicious vines as much as we do!
Can edible vines serve ornamental purposes?
Definitely! Many edible vines not only provide food but also add texture and color to your garden. Vines like Scarlet runner beans, Nasturtiums, and Jasmine are quite ornamental, enhancing your yard’s aesthetic appeal while also offering a delicious harvest.